Black Worms in Turtle Tank: What They Are and How to Get Rid of Them Fast
Have you seen black worms in your turtle tank? Are you worried about your pet turtle? I know how you feel. When I first saw these tiny black worms swimming in my turtle’s home, I got scared too! But don’t worry. I’m here to help you. Today, I will tell you everything about these black…
Have you seen black worms in your turtle tank? Are you worried about your pet turtle? I know how you feel. When I first saw these tiny black worms swimming in my turtle’s home, I got scared too!
But don’t worry. I’m here to help you. Today, I will tell you everything about these black worms. I will show you what they are, where they come from, and how to get rid of them.
Let’s start our journey together!
What Are The Little Black Worms In My Turtle Tank?
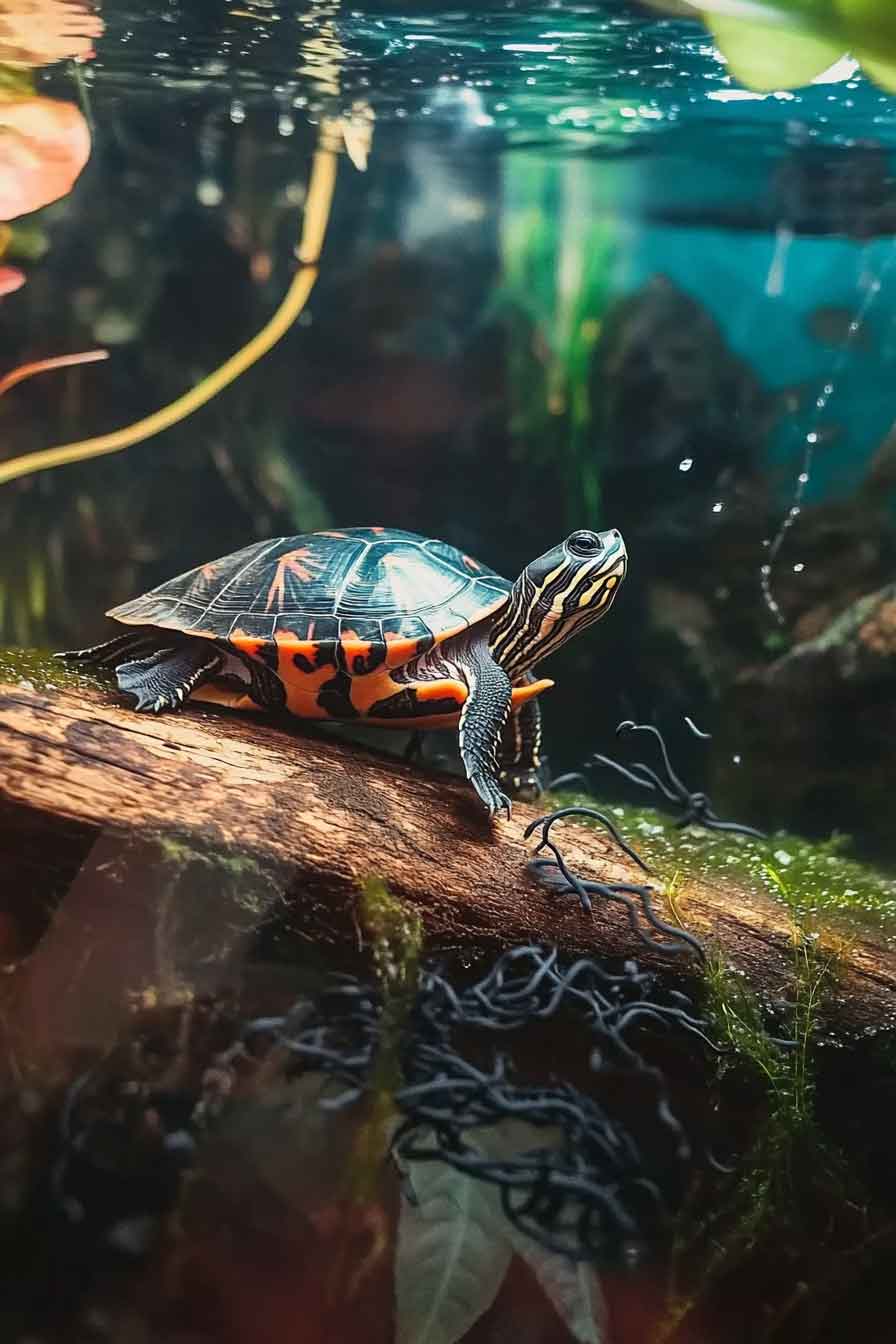
Those little black worms you see are usually baby insects. We call them larvae. They look scary, but they won’t hurt your turtle at all.
I have good news for you. These worms are safe. Your turtle will be okay. But I understand – you don’t want them in your tank. They make your tank look dirty and gross.
What Do These Worms Look Like?
Let me help you understand what you’re seeing:
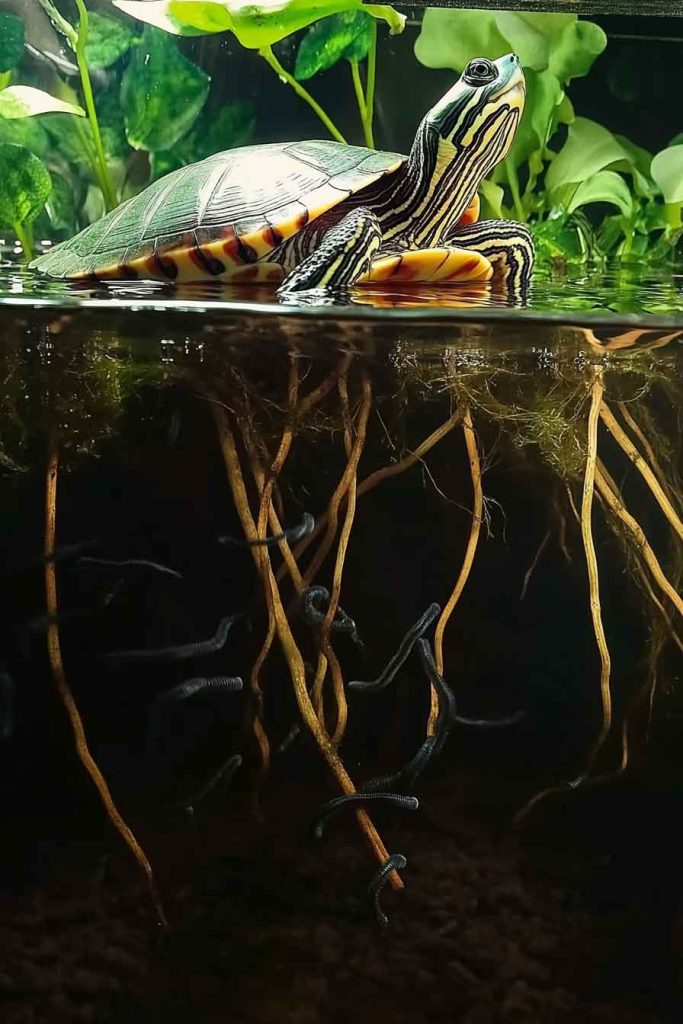
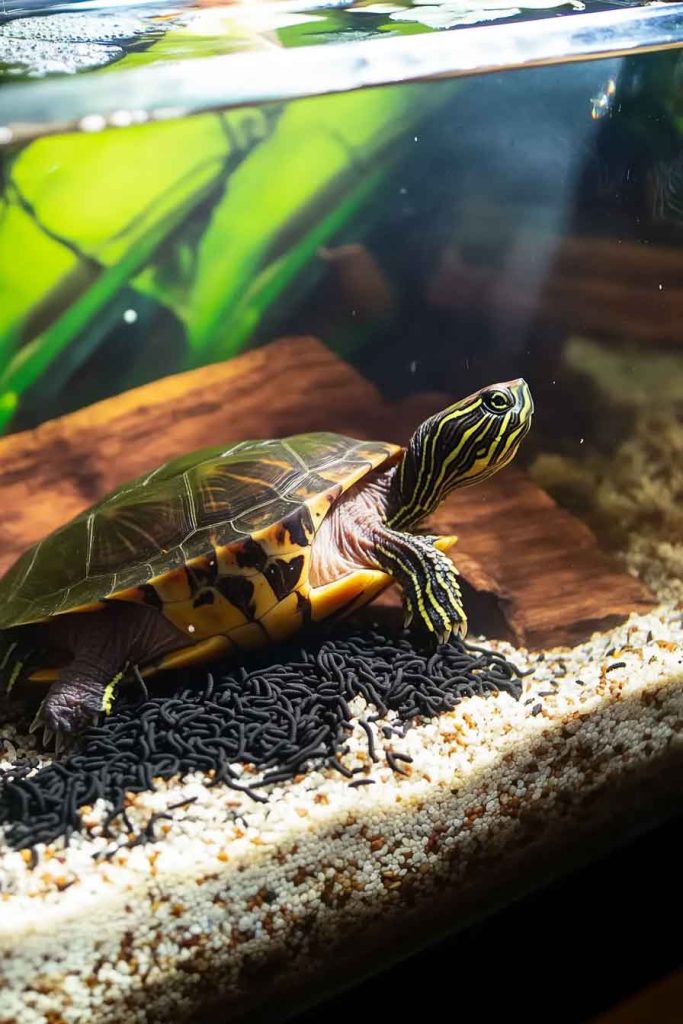
The worms are very small. They look like tiny threads moving in the water. They wiggle and twist around. Some are black, and some are dark brown.
They move a lot. You’ll see them swimming near the glass. They also hide in the rocks and plants. Sometimes they float in the water.
You can see them easily. You don’t need special tools. Your eyes can spot them right away because they’re dark colored.
Different Types Of Black Worms
I want to tell you about the two main types you might see:
Insect Larvae: These are baby flies or mosquitoes. The mom fly laid eggs in your tank. The eggs hatched into these worms. Later, they will turn into flying bugs.
Detritus Worms: These are special water worms. They eat leftover food and turtle poop. They’re actually cleaning your tank! But too many of them means your tank is dirty.
I see these worms in almost every turtle tank I check. Many turtle owners deal with this problem. You’re not alone!
Where Do Black Worms Come From?
Now let me explain how these worms got into your turtle’s home. This part is very important.
How Worms Enter Your Tank
Flying Bugs Lay Eggs: Adult flies come to your tank. They smell the water and food. Then they lay tiny eggs on the water surface. You can’t see these eggs – they’re too small. A few days later, baby worms hatch from the eggs.
New Plants Bring Worms: Did you buy new plants for your tank? Sometimes worm eggs hide on the leaves. When you put the plant in your tank, the eggs come too. Then they hatch in your warm water.
Decorations Can Carry Them: New rocks, caves, and toys might have worm eggs on them. If you don’t clean these items first, the worms will appear in your tank.
Live Food Sources: Do you feed your turtle live fish or plants from outside? These can bring worms into your tank too.
Why Worms Love Your Tank
I need to be honest with you. Worms appear because something in your tank attracts them. Let me tell you what they like:
Leftover Food: When your turtle doesn’t eat all its food, the food sits in the water. It starts to rot. Worms love to eat this rotten food.
Too Much Food: If you give your turtle too much food every day, there will always be leftovers. This makes worms very happy. They get plenty to eat, so they make babies.
Dirty Water: Turtle poop, old food, and dead plants make the water dirty. Bacteria grow in this dirty water. Worms need these bacteria to live and grow.
Warm Water: Turtles like warm water. Worms like warm water too! The warm temperature helps worm eggs hatch faster.
Space Between Rocks: Do you have small rocks or gravel in your tank? Food and poop fall between these rocks. You can’t see this hidden waste. But worms can find it and eat it.
I learned something important: A clean tank rarely has worms. A dirty tank always gets worms.
Black Worms In The Filter
Let me talk about another place where you’ll find these worms – inside your filter!
Why Worms Hide In Filters
Your filter does an important job. It cleans the water and catches waste. All that waste becomes a feast for worms.
The filter is dark inside. Worms like dark places. They feel safe there.
The filter has lots of food. It traps all the dirt and leftover food from your tank. This is like a restaurant for worms!
Water flows through the filter. This brings fresh food to the worms all day long.
I check my turtle’s filter every week. Almost every time, I find a few worms inside. This is normal. But if you see lots of worms, your filter needs cleaning.
Signs Your Filter Has Worms
How do you know if worms are in your filter? Look for these signs:
- You see worms near the filter opening
- Your filter doesn’t work as well as before
- The water flow seems slower
- You see worms when you open the filter to clean it
- Black or brown stuff comes out when you squeeze the filter media
Don’t worry! I’ll show you how to clean your filter later in this guide.
Are Black Worms Dangerous To Turtles?
This is the question everyone asks me. I want to give you a clear answer.
No, black worms will not hurt your turtle. Your turtle is safe. The worms are not poisonous. They don’t bite. They don’t make your turtle sick.
What Your Turtle Thinks About Worms
Here’s something interesting: Your turtle might even try to eat the worms! I’ve seen many turtles snap at these worms. It’s like a snack for them.
The worms are harmless as food. If your turtle eats a few, nothing bad will happen. In fact, some turtles enjoy hunting these worms.
The Real Problem With Worms
But here’s why I still want you to remove them:
They make your tank look bad. When friends see your tank full of worms, they might think you don’t take care of your turtle.
They show your tank is dirty. Too many worms mean there’s too much waste in the water. This dirty water can make your turtle sick over time.
They turn into flying bugs. The larvae will grow up. Then they become flies or mosquitoes. These bugs will fly around your house. Nobody wants that!
They multiply fast. A few worms today can become hundreds of worms next week. It’s better to stop them early.
So while the worms themselves are safe, having them means something is wrong with your tank care.
How To Get Rid Of Black Worms In Turtle Tank
Now comes the best part! I’m going to teach you exactly how to remove these worms. I’ve used these methods many times. They work!
Step 1: Clean Your Tank Water
Water changes are your first weapon against worms.
Change water every week. Take out half the water (50%) and add fresh, clean water. This removes many worms and their eggs.
Use a vacuum cleaner. Get a special aquarium vacuum. It sucks up worms, poop, and food from the bottom of your tank. I use mine every water change day.
Make the water fresher. Clean water makes it hard for worms to survive. They like dirty, old water. When you change the water often, worms have nowhere to hide.
Here’s how I do my water changes:
- Get a clean bucket ready
- Use the vacuum to clean the bottom of the tank
- Suck up the dirty water into the bucket
- Look for worms while you vacuum – try to suck them all up
- Add new, clean water that’s the same temperature
- Check if you see any more worms
Do this every single week. It’s the most important thing you can do!
Step 2: Remove All Uneaten Food
This step is super important. Listen carefully!
Watch your turtle eat. When you feed your turtle, stay and watch. See how much food your turtle actually eats.
Take out leftover food. If food is still in the tank after 15 minutes, use a net to scoop it out. Don’t let it sit in the water.
Feed less food. I know you love your turtle. But too much food causes big problems. Feed only what your turtle can eat in 10-15 minutes.
Feed at the same time daily. This helps your turtle eat everything. A hungry turtle won’t leave food behind.
I made this mistake before. I gave my turtle too much food because I wanted to make it happy. But the leftover food created a worm paradise! Now I’m more careful.
Step 3: Clean The Tank Decorations
Everything in your tank needs to be clean. Let me show you how:
Take everything out. Remove rocks, caves, plants, and toys from your tank. Put them in a safe place.
Prepare a cleaning solution. Mix bleach with water. Use 1 part bleach to 20 parts water. This kills worm eggs and bacteria.
Soak items for 5 minutes. Put all your tank decorations in the bleach water. Wait 5 minutes. This cleaning time is enough to kill worms and eggs.
Rinse very well. This is critical! Bleach can hurt your turtle. Rinse everything with tap water for at least 5 minutes. Make sure no bleach smell remains.
Let them dry. Put the items in the sun or a clean towel. Wait 3-4 hours until they’re completely dry. Sunlight helps kill any remaining germs.
Put them back in the tank. Now your decorations are clean and safe!
I do this deep cleaning once a month. It keeps my turtle’s home fresh and worm-free.
Step 4: Clean The Substrate
The substrate is the stuff on the bottom of your tank – rocks, gravel, or sand.
Small rocks hide waste. Food and poop fall between the rocks. Worms love this hidden food.
Clean the substrate weekly. Use your aquarium vacuum every time you change water. Stir up the rocks so the vacuum can suck up hidden waste.
Replace it sometimes. Every few months, take out all the rocks. Clean them just like you clean decorations (bleach solution, rinse, dry). Or buy new substrate.
Consider changing to bigger rocks. Bigger rocks have bigger spaces. It’s easier to clean between them. Less waste gets trapped.
Some turtle owners don’t use any substrate. They keep the tank bottom bare. This makes cleaning much easier! I actually prefer this method now.
Step 5: Replace Your Filter Media
Your filter has special materials inside that clean the water. This is called filter media.
Change filter media often. Old filter media gets clogged with waste. Worms live in this waste. I change my filter media every 2-3 weeks.
Rinse the media weekly. In between changes, take out the filter media. Rinse it with tank water (not tap water – tap water kills good bacteria). This removes some worms and waste.
Get a better filter. If your current filter is too small, upgrade to a bigger one. A strong filter keeps water cleaner. Clean water means fewer worms.
I noticed something amazing when I upgraded my filter. The worms almost disappeared! A good filter makes a huge difference.
Step 6: Check New Items Before Adding Them
Prevention is the best cure! Let me teach you how to stop worms before they enter your tank.
Inspect new plants carefully. Look at every leaf and stem. Check for tiny eggs or worms. If you see anything strange, don’t buy that plant.
Quarantine new turtles. If you get a new turtle, keep it in a separate tank for 2 weeks. Watch for any worms or health problems. Only add it to your main tank if everything looks good.
Rinse new decorations. Even if they look clean in the store, wash them at home. Use hot water and a brush. Let them dry before putting them in your tank.
Avoid wild-caught food. Don’t bring fish, plants, or insects from ponds or rivers. They almost always carry worms and diseases.
This prevention step saves you so much work later!
How To Clean Black Worms From Your Filter
Now I’ll give you detailed steps to clean your filter. Follow along with me!
What You’ll Need
Before we start, gather these items:
- A bowl or bucket
- Hot water (not boiling – just hot from your tap)
- A small brush (an old toothbrush works great)
- Clean towels
- Patience and time
Detailed Cleaning Steps
Step 1: Turn Off And Remove The Filter
Safety first! Turn off the filter power. Unplug it from the wall. Wait a minute for the motor to stop completely.
Now carefully lift the filter out of the tank. Water will drip, so have a towel ready. Put the filter in your sink or on a towel.
Step 2: Take The Filter Apart
Every filter is different. But most filters have these parts:
- The outer case
- The filter media (sponges, carbon, etc.)
- The motor and impeller
- Tubes and attachments
Take apart your filter piece by piece. Remember how it goes together! You can take a photo with your phone to help you remember.
Step 3: Clean Each Part With Hot Water
Turn on your hot tap water. Hold each filter part under the water. Use your brush to scrub away the black gunk and worms.
Pay special attention to:
- The filter media (squeeze it many times under hot water)
- The tubes (run hot water through them)
- The impeller area (worms love to hide here)
- All corners and crevices
Don’t use soap! Soap chemicals can hurt your turtle. Hot water alone is enough.
Step 4: Soak Everything
Fill your bowl with hot tap water. Put all the filter parts in the water. Let them soak for one full hour.
This soaking time kills worm eggs that you can’t see. It also loosens any stubborn dirt.
While items soak, you can clean your tank or take a break!
Step 5: Rinse Again
After soaking, rinse everything one more time under running water. Make sure no worms or dirt remain anywhere.
Check inside all the tubes. Look in all the corners. Squeeze the filter media until the water runs clear.
Step 6: Put The Filter Back Together
Now comes the puzzle part! Use your photo if you need help. Put all the pieces back where they belong.
Make sure everything fits tight. Loose parts can let dirty water bypass the filter.
Step 7: Change The Tank Water
Before you put the filter back in the tank, do a big water change. Remove 50% of the old water. Add fresh, clean water.
This gives your turtle and your filter a fresh start!
Step 8: Reinstall The Filter
Put your clean filter back in the tank. Plug it in. Make sure it starts running properly.
Check that water flows smoothly. Listen for any strange noises. If everything sounds normal, you’re done!
How Often Should You Clean The Filter?
I clean my turtle tank filter every single week. Here’s my schedule:
- Every week: Quick rinse of the filter media
- Every 2 weeks: Replace disposable filter media
- Every month: Deep clean like I just described
This schedule keeps worms away and keeps my turtle healthy!
Extra Tips To Keep Worms Away Forever
I want to share some bonus tips I’ve learned over the years.
Tip 1: Don’t Overfeed Your Turtle
This is the number one mistake I see. People give their turtles too much food because they love them.
How much food is right? Feed your turtle an amount equal to the size of its head. That’s the perfect portion!
How often should you feed? Young turtles (under 1 year) eat daily. Adult turtles only need food every other day.
What happens if you overfeed? Extra food rots in the water. This creates perfect conditions for worms. Your turtle might also get fat and unhealthy.
I keep a feeding chart on my wall. I mark every time I feed my turtle. This helps me not overfeed.
Tip 2: Get Live Plants That Help Clean Water
Some plants are like little cleaning machines! They eat the waste in your water.
Good plants for turtle tanks:
- Anacharis
- Java Fern
- Water Lettuce
- Duckweed
- Amazon Sword
These plants suck up the bad stuff that worms love to eat. When you add these plants, you have fewer worms!
But remember: Turtles like to eat plants too. Choose tough plants that can survive turtle bites.
Tip 3: Add More Beneficial Bacteria
Good bacteria are your friends! They eat waste before worms can eat it.
How to add good bacteria:
- Buy beneficial bacteria bottles at pet stores
- Add them to your tank after water changes
- Put them in your filter too
- Follow the directions on the bottle
These bacteria work 24 hours a day, keeping your tank clean. I add them every week!
Tip 4: Keep Your Tank Away From Windows
Sunlight seems nice, right? But it causes problems!
Problems with sunlight:
- It grows algae very fast
- It makes water too warm
- It attracts flying bugs
- Bugs lay more eggs in sunny tanks
Keep your tank in a spot with indirect light. Use a good aquarium light instead of sunlight.
Tip 5: Use A Stronger Light
Speaking of lights, here’s an interesting trick: Some worms don’t like bright light!
A strong LED aquarium light can help. The bright light makes worms uncomfortable. They have fewer babies in bright conditions.
But don’t make it too bright – your turtle needs some shade too. Find a good balance.
Tip 6: Check Your Water Quality
Bad water quality invites worms. Test your water regularly!
What to test:
- Ammonia (should be 0)
- Nitrite (should be 0)
- Nitrate (should be under 20)
- pH (should be 7.0-8.0 for most turtles)
You can buy test kits at pet stores. I test my water every week. When the water quality is perfect, worms can’t thrive.
Tip 7: Keep A Cleaning Schedule
I’m going to be honest with you. The secret to a worm-free tank is consistency!
My weekly schedule:
- Monday: Quick check, remove any visible worms
- Wednesday: Feed turtle (carefully watching portions)
- Friday: Water change day! Change 50% of water, vacuum substrate
- Saturday: Clean filter media
- Sunday: Check all equipment, test water
Write your own schedule. Stick to it every single week. This routine makes all the difference!
What NOT To Do
Let me warn you about some mistakes people make.
Don’t Use Chemicals
Pet stores sell chemicals that promise to kill worms. I tried them once – big mistake!
Why chemicals are bad:
- They can poison your turtle
- They kill beneficial bacteria
- They harm live plants
- They make the water unsafe
- They’re expensive
The natural methods I taught you work better and are much safer!
Don’t Remove Your Turtle During Cleaning
Some people think they need to take their turtle out during every cleaning. This is wrong!
Why this is a bad idea:
- It stresses your turtle out
- Your turtle gets cold outside the water
- It takes too much time
- It’s unnecessary for regular cleaning
Only remove your turtle for deep cleaning (once a month). For weekly cleaning, leave your turtle in the tank. Just change the water and clean around it.
Don’t Forget To Maintain Temperature
Turtles need warm water. But very warm water makes worms multiply faster!
The right temperature:
- Most turtles: 75-80°F (24-27°C)
- Basking area: 85-90°F (29-32°C)
Use a good thermometer. Check the temperature daily. If it’s too hot, worms will appear more often.
Don’t Give Up!
Sometimes you do everything right, but worms still appear. This can be frustrating!
Don’t give up! Keep following the cleaning routine. It might take 2-3 weeks to fully eliminate worms. Be patient and consistent.
I once had a really bad worm problem. It took me almost a month of daily cleaning to fix it. But I didn’t give up, and eventually, the worms disappeared!
Frequently Asked Questions
Let me answer the questions people ask me most often.
Can Black Worms Make My Turtle Sick?
No, the worms themselves won’t make your turtle sick. But the dirty water that causes worms CAN make your turtle sick.
Dirty water can cause:
- Shell rot
- Respiratory infections
- Eye infections
- Weak immune system
So focus on keeping the water clean, not just removing worms!
Will My Turtle Eat The Worms?
Yes! Many turtles will eat black worms. Some turtles think they’re tasty snacks!
If your turtle eats a few worms, don’t worry. The worms are safe to eat. But don’t let your turtle rely on worms as food. Keep feeding proper turtle food.
How Long Do Black Worms Live?
Most insect larvae live 1-2 weeks before turning into flying bugs. Detritus worms can live several months.
If you don’t clean your tank, one worm can lay hundreds of eggs. Those eggs hatch into more worms. Soon you have an infestation!
This is why it’s important to remove them quickly!
Can Worms Hurt My Filter?
Not really. Worms won’t damage your filter equipment. But a filter full of worms won’t work properly.
The worms and their waste clog the filter. Water can’t flow through correctly. This means your water stays dirty.
Clean your filter regularly to keep it working well!
Do All Turtle Tanks Get Worms?
Almost every turtle tank will get worms at some point. It’s very common!
Even the cleanest tanks can get a few worms sometimes. Don’t feel bad if it happens to you.
The difference between a good turtle owner and a bad one is this: Good owners notice the worms early and take action. Bad owners ignore the problem until it’s huge.
Are Black Worms The Same As Parasites?
No! This is important to understand.
Black worms in the tank are NOT parasites. They don’t live inside your turtle’s body. They’re just annoying visitors in the water.
Real parasites live inside your turtle. They need medicine from a vet to treat.
If you’re worried about parasites, take your turtle to a reptile vet for a checkup.
What If The Worms Keep Coming Back?
If worms keep returning no matter what you do, something is wrong with your routine.
Common reasons worms come back:
- You’re not changing water often enough
- You’re still overfeeding
- Your filter is too small or broken
- There’s hidden waste somewhere you can’t see
- Your tank is too close to a window
Go through this guide again. Make sure you’re following every step. If worms still come back, consider getting a bigger filter or changing your substrate.
Can I Prevent Worms Completely?
Perfect prevention is hard, but you can get very close!
If you:
- Clean weekly
- Don’t overfeed
- Have a good filter
- Test water regularly
- Quarantine new items
Then you probably won’t see worms more than once or twice a year. And when you do see them, you can remove them quickly before they multiply!
My Final Thoughts
I hope this guide helped you understand black worms in turtle tanks!
Let me remind you of the most important points:
What are black worms? They’re insect larvae or detritus worms. They’re not dangerous, but you should remove them.
Where do they come from? They come from eggs that flying bugs lay in your tank. Leftover food and dirty water help them grow.
How do you remove them? Clean your tank every week! Change 50% of the water. Remove uneaten food. Clean your filter. Keep everything fresh and clean.
The secret to success? Consistency! Follow a regular cleaning schedule. Don’t skip weeks. Don’t overfeed. Keep the water quality perfect.
Remember, every turtle owner faces this problem. You’re not alone! The good news is that with proper care, you can have a beautiful, worm-free tank.
Your turtle depends on you to keep its home clean and healthy. By following the tips in this guide, you’re being a great turtle parent!
I believe in you. You can do this! Start today with a good water change and cleaning session. Your turtle will thank you with healthy, happy swimming!
If you ever feel overwhelmed, just come back to this guide. Read it again. Take it one step at a time. Soon, keeping a clean tank will become a natural habit.
Good luck with your turtle care journey! May your tank stay clean, clear, and worm-free
Remember: A clean tank is a happy tank. And a happy tank means a happy turtle!